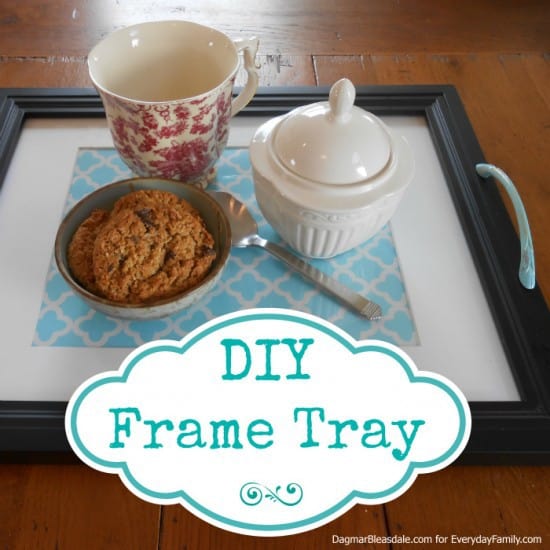
I always have extra frames in the house — I buy them for a dollar or two at tag sales or the thrift store — and I recently made this cute tray out of a large picture frame and two cabinet handles.
I love how it turned out.
When I saw this idea while searching for more DIY ideas, I decided that I just had to make myself a pretty tray out of a frame that I can individualize for years to come.
I decorated mine with a trellis pattern, but you could personalize your with photos, letters, movie ticket stubs, etc. – the possibilities are endless.
This tray also makes a wonderful gift, don’t you think? Who wouldn’t want an extra tray for their coffee table or kitchen?
DIY Frame Tray
You need these supplies:
- frame (large enough for a tray)
- drill
- ruler
- 2 cabinet door handles (you can find some at the dollar store)
- optional: spray paint
- optional: you might need to buy shorter screws that fit or cut don the ones that come with the handles
- optional: little floor protector pads
DIY Frame Tray Tutorial:
- Figuring out where you want to mount the handles on the tray. Find the middle of the shorter sides of the frame and then figure out where you need to drill the holes. I put my handle sideways so I ccould see where the holes are and marked my frame accordingly.
- Drill the four holes. Make sure you use the right-size drill bit that is comparable with the size of the screws.
- If your handles need spray painting, paint them outside or in a well-ventilated area of your home. Spray the first coat on the handles, let the paint dry, and repeat until you are happy with the result. My handles could have used a second coat, but leaving them like this actually gives them an interesting antique look.
- Take out the back of the frame and insert what you wish to display on the top side of the tray. I used contact per with a trellis pattern.
- Use strong tape or even hot glue to secure the back of the frame to the frame so it can hold the weight of the items you will be placing on the tray.
- Once the paint is totally dry on the handles, screw them to the frame. If the screws are longer than the thickness of the frame, you’ll need to cut them or buy shorter ones. Or buy handles that can be screwed in from the top with shorter screws.
- If the screws on the back of the frame could scratch your furniture, add little floor protector pad stickers usually intended to go on chairs on the back.
What would you display in your DIY frame tray?
If you like this idea, I’d love it if you pin it.
Sherry says
That is really cute Dagmar! Thanks for sharing at HSH!
Kristen from The Road to Domestication says
Hi, Dagmar! We wanted to let you know that we loved this link-up to the #HomeMattersParty last week so much that we featured it this week! Would love for you to check it out if you get a chance :) Happy Friday! http://theroadtodomestication.com/2015/07/24/home-matters-linky-party-47/
Dagmar Bleasdale says
Hi Kristen, thank you so much for featuring my DIY tray! I’ll pop over for sure!
Kristen from The Road to Domestication says
This turned out so beautifully! Thanks so much for taking the time to link up with us at the #HomeMattersParty – we hope to see you again on Friday!
Melissa French, The More With Less Mom says
This is a great way to use what you have to make something useful. Thanks for posting. Hello from Busy Monday.
Cristi says
This is amazing! When we redo our kitchen, I definitely need to make a chalkboard menu. Thanks so much for sharing and for linking up with our Living With Style Linky Party. Have a great weekend!
Cristi says
Sorry about that! My internet’s in one of its moods tonight! It doesn’t like to switch tabs when I click on things. Lol…
I made something similar to this a while back. This would make an absolutely amazing present for a mom or dad or grandparent with a picture of a little one in it or even handprints or footprints! Thanks so much for sharing and for linking up with our Living With Style Linky Party! Have an awesome weekend!
Dagmar Bleasdale says
Thank you for your comments, Cristi!
Nina Lewis says
I’m dropping by from the SITS Girls link party. What a fabulous idea! It seems like I always need a tray — especially for taking things out to the patio when we eat outside. This will help me solve that problem!
I have a link party that I’m trying to grow. I invite you to share this wonderful idea (and a couple of other ones) at my Grandma Ideas Sharing Time link party. I’m sure my readers would love this project as much as I do! It’s at http://grandmaideas.com.
The link up goes from Wednesday through Friday at midnight Mountain Daylight Time. I know that there isn’t much time left for this link party. If you can’t make it, please drop by for the one next week. I look forward to seeing you there.
All the best,
Nina
Gina Marie says
This is such an awesome idea! I need to make myself one (maybe then my hubby will bring me breakfast in bed, lol)! Dropping in from Craft and Delicious link Party! Thank you for the inspiration!
Gina Marie from Always Savory
Laurie says
You did such a beautiful job on this! Very pretty!
Thanks again for sharing your projects with us at Brag About It!
~Laurie
Cathy says
Very pretty – I love that you used a thrift store frame. I have a ton of them that need to be used Thank you for sharing at Share It One More Time. Cathy
Marianne says
Such a great idea!! I pinned this on my Super Duper Craft Ideas Pinterest board. I hope it gets lots of recognition. So many different versions could be done from this.
Thank you for sharing,
Marianne
Melissa says
Great idea! So cute!!
I pinned!
Dagmar Bleasdale says
Glad you like it, Melissa! I look forward to using this tray for years to come. Thanks for the pin!!